Title


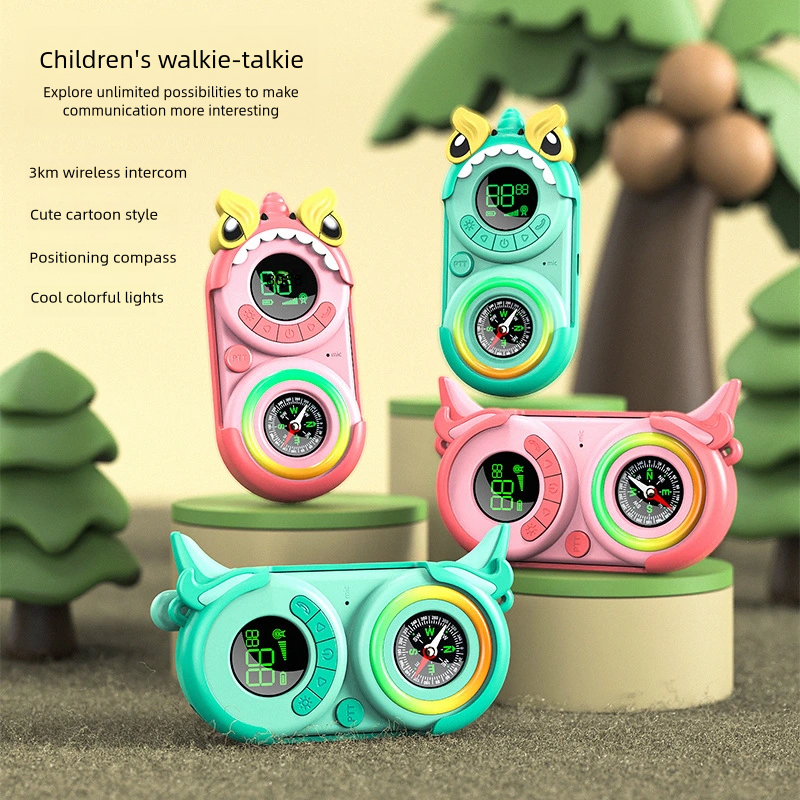
Wireless Handheld Walkie Talkie | Long Range 3km
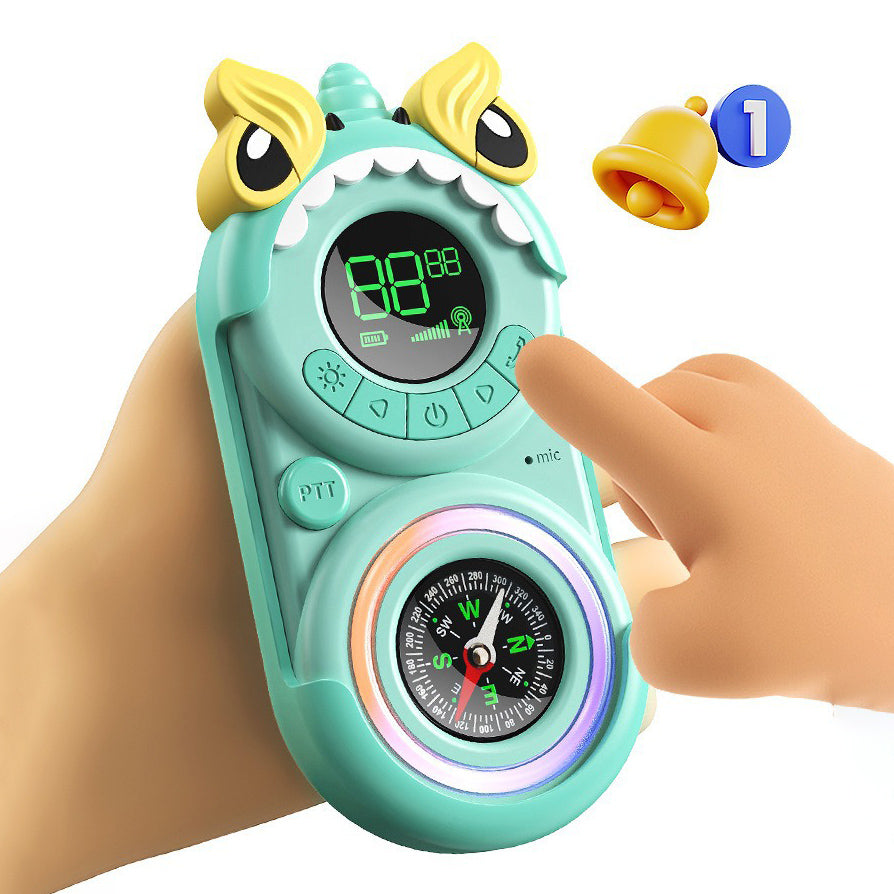
🎙️ Wireless Handheld Walkie Talkie | Long Range 3km
✅ Long-Range Communication: Stay connected up to 3km in open areas. 📡
✅ Compact & Portable: Lightweight design, easy to carry anywhere. 🎒
✅ Clear Audio Quality: Crystal-clear sound even in noisy environments. 🔊
✅ Durable Build: Made for outdoor adventures, sturdy and reliable. 🛠️
✅ Easy to Use: Simple controls for quick communication. 🧑🤝🧑
✅ Multi-Purpose: Perfect for camping, hiking, festivals, and workplaces. ⛺🚶♂️🏕️
✅ Battery Powered: Long-lasting performance for extended use. 🔋
Product Info:
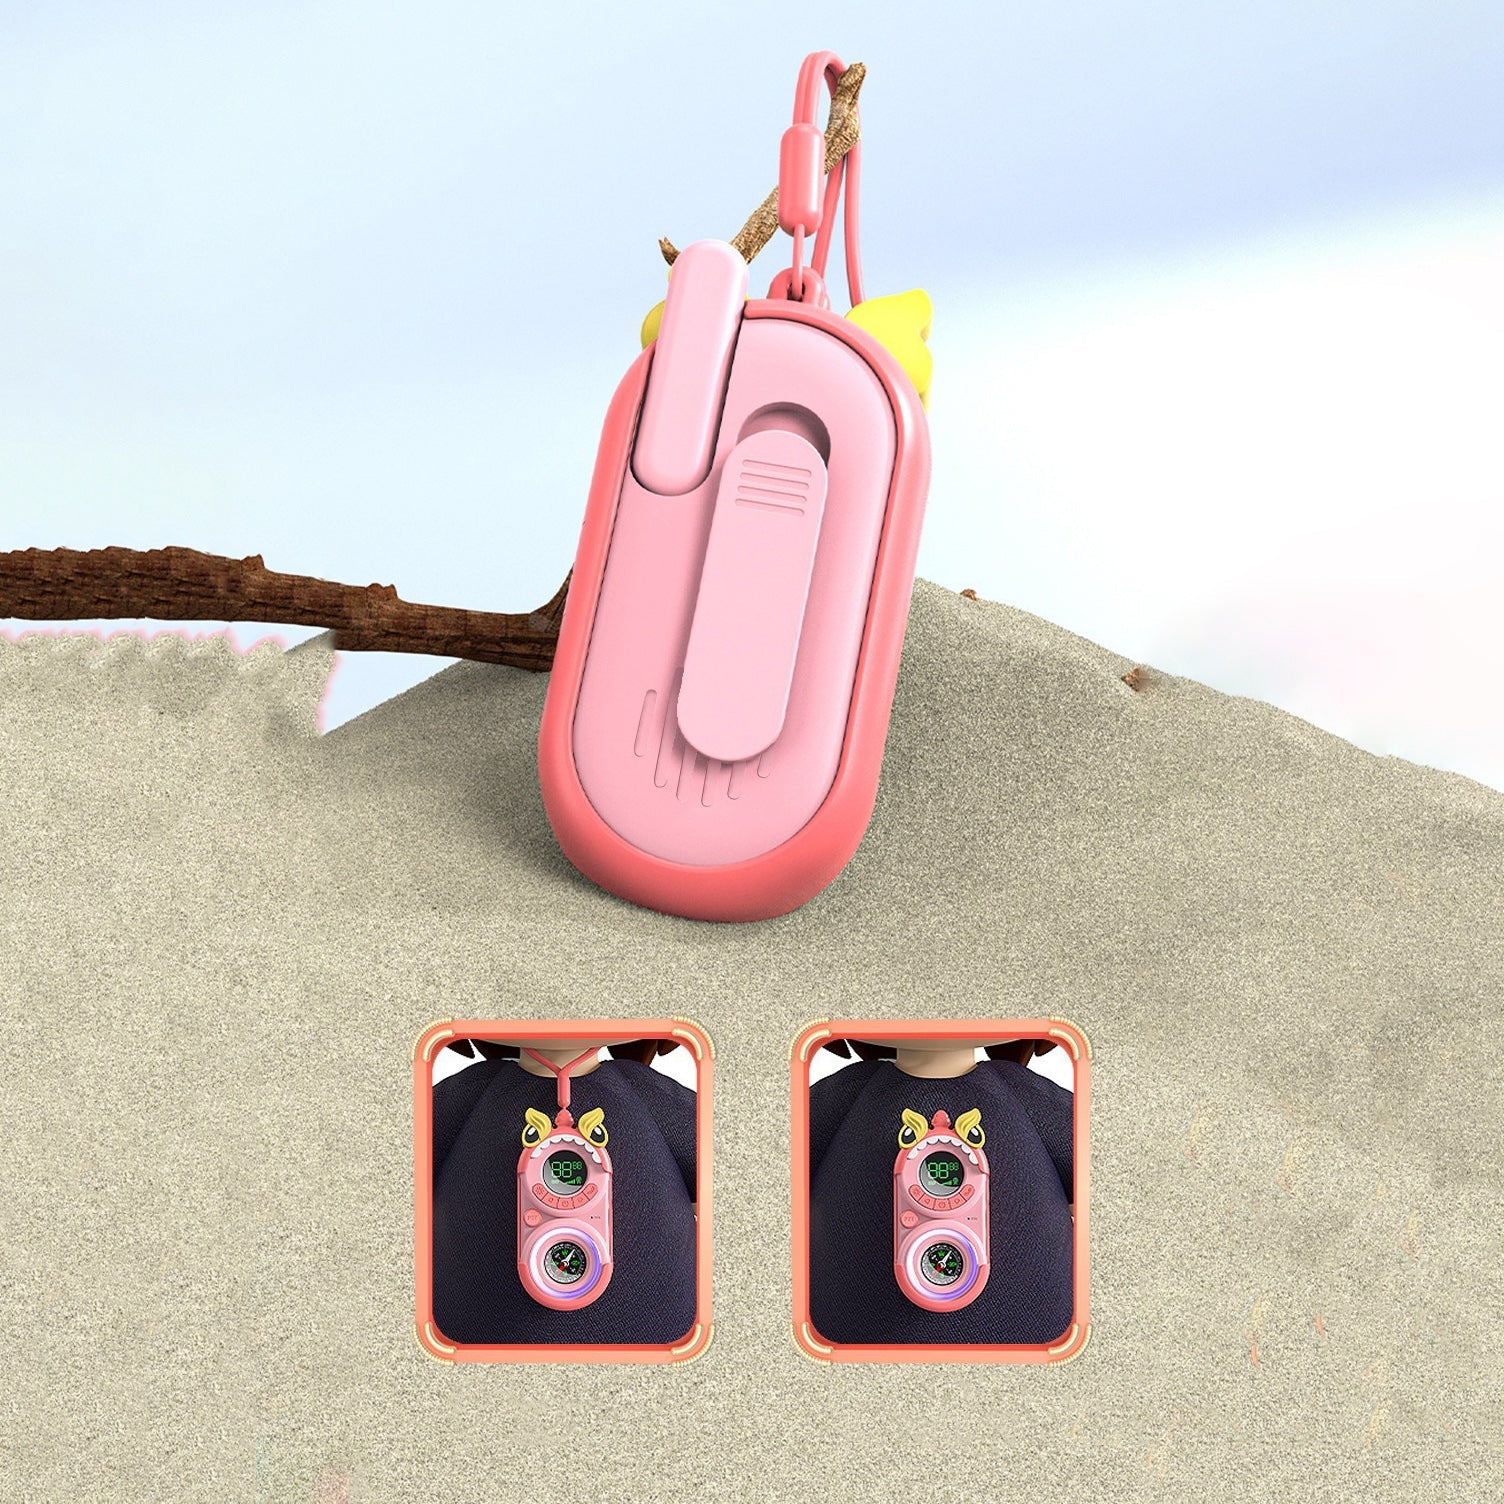
Box Size: 18cm 17cm x 4.5cm (Approx.)
Product Size: 12cm x 6cm x 3cm (Approx.)
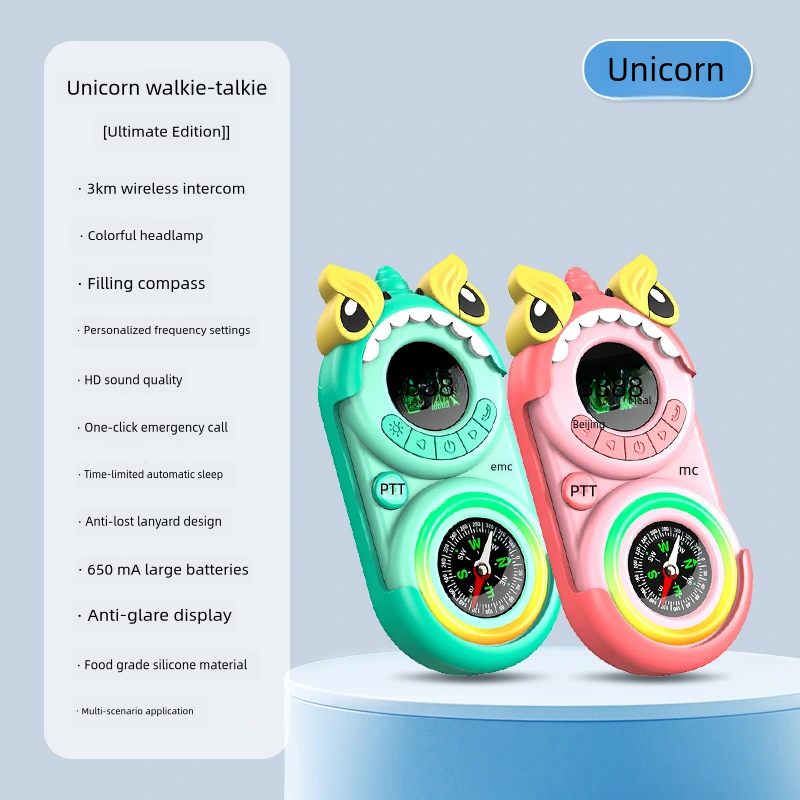
Color & Design: Unicorn & Owl
Warranty & Guarantee: No
Package Includes: 2 x Walkie Talkie Units
1 x Instruction Manual
1 x Neck Strap
1 x USB Charging Cable (Type C)
(Batteries Not Included)
🔗 Stay Connected, Anytime, Anywhere! 🌍
Product Specifications:
Battery voltage/power: BAT3.7V/≤ 417mA/≤1.55W
DC input/power: USB 5V/≤ 360mA/≤1.75W
Battery Lithium battery: 650mA
Range: Up to 3 kilometers (open field)
Transmission power: 500mW
Battery static current Battery: 3.7V Shutdown: 10uA
Function Introduction
Basic walkie talkie operation
- press down 3s--4s The walkie talkie can be turned on.
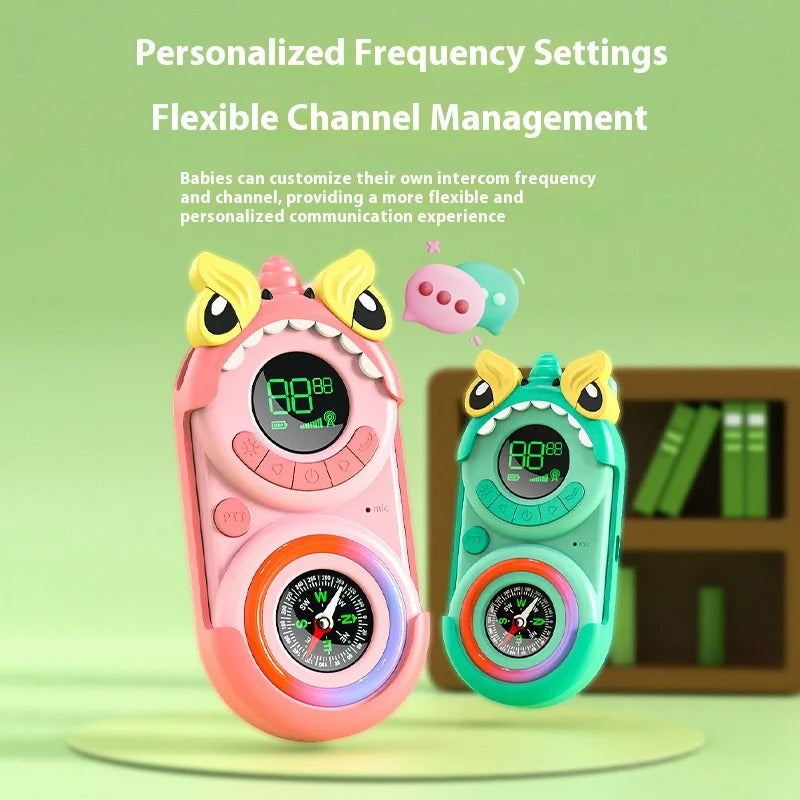
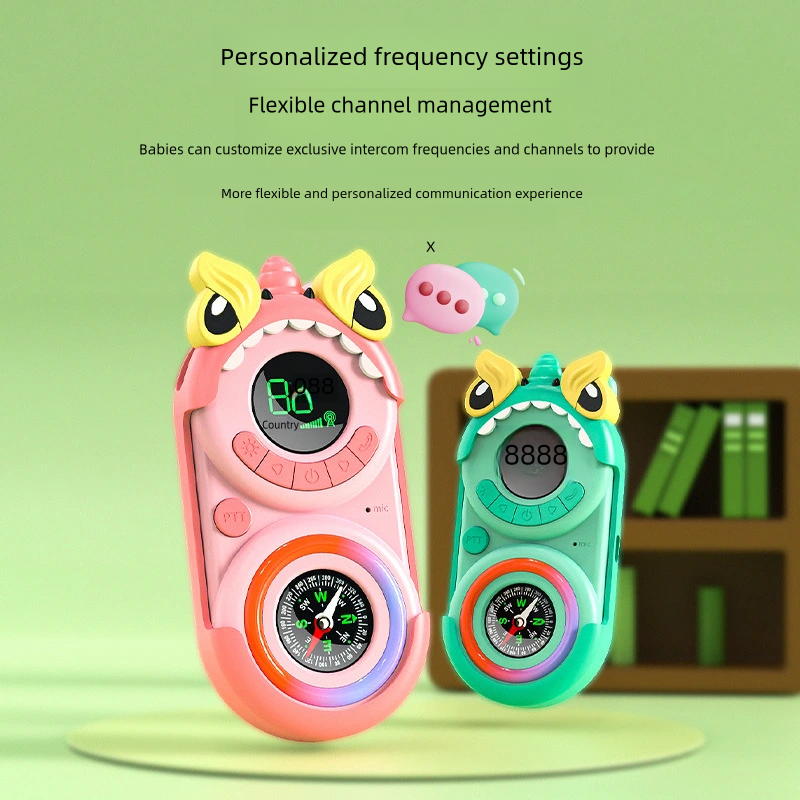
- Press the power button once to enter channel settings, and the channel display pattern will start flashing. Press / Select the channel, press the PTT key to confirm and exit.
- Press the power button twice and select the group code. Turn it off to indicate no code, 01-38 to indicate CTCSS code, and 39-99 to indicate DCS code.
- Press the power button 3 times to enter the VOX function selection. There are sensitivity options for 1, 2, and 3 gears, with "OF" turned off by default.
- Press the power button 4 times to enter the call tone selection function. There are 01 to 10 sound options available.
- Press the power button 5 times to enter the button sound selection function, turn on the button sound selection "ON", and turn off the button sound selection "OF".
- Press the power button 6 times to enter the start end of the call tone selection function. Select "ON" to release the PTT, which will have a tone. Conversely, select "OF" to have no tone.
- Press the power button 7 times to return to the main page, and press PTT to confirm the exit menu.
Set Channel:
- Turn on the walkie talkie and press the power button to enter channel selection
- Press <=> to select the channel with the key.
- Press PTT to save channel settings.
To communicate, all walkie talkies within the group must be set to the same channel and interference cancellation code. Hold down the PTT while speaking and hold the walkie talkie 2-3 inches away from the mouth, speaking directly into the microphone. When speaking, do not cover the microphone. After you finish speaking, release the PTT (press to speak, release to listen).
Characteristic
Interference cancellation code
By selecting code combinations, the performance of the computer is enhanced. Set the code for the channel:
- Press the power button until the code starts flashing.
- Press <=> key selection code 0-99 or 99-0
- Press the PTT key to save the code settings.
You can use this process to set an uncertain code for each channel.
Note: You must set the interference cancellation code to 0 on the FRS walkie talkie station that uses the interference cancellation code in order to communicate with other FRS walkie talkie stations that do not have the interference cancellation code.
Lock keyboard
To avoid any additional changes to your walkie talkie channel, press and hold the call button for 3 seconds to lock it, and then press and hold the unlock button for 3 seconds again.
Note: When locked, only PTT and call keys are valid.
To set the call tone
Your walkie talkie can call your group members, with 01-10 call tones to choose from.
- Press the 1 power button 4 times until Appear, enter call tone selection;
- Press" /" To change and select the call tone; 3.Press the PTT key to save.
Turn on light button
After clicking the light button, any button will light up the light. The screen light is on, while the screen light is off.
Reset hole
When the machine experiences abnormal crashes or other situations, a short poke with a needle-like object can restart it.
Voice operation transmission (VOX)
Speak into the microphone of the walkie talkie instead of pressing the PTT button.
🎙️ Wireless Handheld Walkie Talkie | Long Range 3km
✅ Long-Range Communication: Stay connected up to 3km in open areas. 📡
✅ Compact & Portable: Lightweight design, easy to carry anywhere. 🎒
✅ Clear Audio Quality: Crystal-clear sound even in noisy environments. 🔊
✅ Durable Build: Made for outdoor adventures, sturdy and reliable. 🛠️
✅ Easy to Use: Simple controls for quick communication. 🧑🤝🧑
✅ Multi-Purpose: Perfect for camping, hiking, festivals, and workplaces. ⛺🚶♂️🏕️
✅ Battery Powered: Long-lasting performance for extended use. 🔋
Product Info:
Box Size: 18cm 17cm x 4.5cm (Approx.)
Product Size: 12cm x 6cm x 3cm (Approx.)
Color & Design: Unicorn & Owl
Warranty & Guarantee: No
Package Includes: 2 x Walkie Talkie Units
1 x Instruction Manual
1 x Neck Strap
1 x USB Charging Cable (Type C)
(Batteries Not Included)
🔗 Stay Connected, Anytime, Anywhere! 🌍
Product Specifications:
Battery voltage/power: BAT3.7V/≤ 417mA/≤1.55W
DC input/power: USB 5V/≤ 360mA/≤1.75W
Battery Lithium battery: 650mA
Range: Up to 3 kilometers (open field)
Transmission power: 500mW
Battery static current Battery: 3.7V Shutdown: 10uA
Function Introduction
Basic walkie talkie operation
- press down 3s--4s The walkie talkie can be turned on.
- Press the power button once to enter channel settings, and the channel display pattern will start flashing. Press / Select the channel, press the PTT key to confirm and exit.
- Press the power button twice and select the group code. Turn it off to indicate no code, 01-38 to indicate CTCSS code, and 39-99 to indicate DCS code.
- Press the power button 3 times to enter the VOX function selection. There are sensitivity options for 1, 2, and 3 gears, with "OF" turned off by default.
- Press the power button 4 times to enter the call tone selection function. There are 01 to 10 sound options available.
- Press the power button 5 times to enter the button sound selection function, turn on the button sound selection "ON", and turn off the button sound selection "OF".
- Press the power button 6 times to enter the start end of the call tone selection function. Select "ON" to release the PTT, which will have a tone. Conversely, select "OF" to have no tone.
- Press the power button 7 times to return to the main page, and press PTT to confirm the exit menu.
Set Channel:
- Turn on the walkie talkie and press the power button to enter channel selection
- Press <=> to select the channel with the key.
- Press PTT to save channel settings.
To communicate, all walkie talkies within the group must be set to the same channel and interference cancellation code. Hold down the PTT while speaking and hold the walkie talkie 2-3 inches away from the mouth, speaking directly into the microphone. When speaking, do not cover the microphone. After you finish speaking, release the PTT (press to speak, release to listen).
Characteristic
Interference cancellation code
By selecting code combinations, the performance of the computer is enhanced. Set the code for the channel:
- Press the power button until the code starts flashing.
- Press <=> key selection code 0-99 or 99-0
- Press the PTT key to save the code settings.
You can use this process to set an uncertain code for each channel.
Note: You must set the interference cancellation code to 0 on the FRS walkie talkie station that uses the interference cancellation code in order to communicate with other FRS walkie talkie stations that do not have the interference cancellation code.
Lock keyboard
To avoid any additional changes to your walkie talkie channel, press and hold the call button for 3 seconds to lock it, and then press and hold the unlock button for 3 seconds again.
Note: When locked, only PTT and call keys are valid.
To set the call tone
Your walkie talkie can call your group members, with 01-10 call tones to choose from.
- Press the 1 power button 4 times until Appear, enter call tone selection;
- Press" /" To change and select the call tone; 3.Press the PTT key to save.
Turn on light button
After clicking the light button, any button will light up the light. The screen light is on, while the screen light is off.
Reset hole
When the machine experiences abnormal crashes or other situations, a short poke with a needle-like object can restart it.
Voice operation transmission (VOX)
Speak into the microphone of the walkie talkie instead of pressing the PTT button.
By changing our most important processes and
products, we have already made a big leap forward. This ranges from the
increased use of more sustainable fibers to the use of more
environmentally friendly printing processes to the development of
efficient waste management in our value chain.
Shipping & Returns
Shipping
We deliver your parcel within 2–3 working days. As soon as your package has left our warehouse, you will receive a confirmation by email. This confirmation contains a tracking number that you can use to find out where your package is.
Returns
We offer free returns within 30 days. All you have to do is fill out the return slip that you received in your package and stick the prepaid label on the package.Please note that it can take 2 weeks for us to process your return. We will do our best to complete this process as soon as possible.
Warranty
We provide a 2-year limited warranty, from the date of purchase for all our products.
If you believe you have received a defective product, or are experiencing any problems with your product, please contact us.
This warranty strictly does not cover damages that arose from negligence, misuse, wear and tear, or not in accordance with product instructions (dropping the product, etc.).
Secure Payment
Your payment information is processed securely. We do not store credit card details nor have access to your credit card information.
We accept payments with :
Visa, MasterCard, American Express, Paypal, Diners Club, Discover and more.
Secure Payment
Your payment information is processed securely. We do not store credit card details nor have access to your credit card information.
We accept payments with :
Visa, MasterCard, American Express, Paypal, Diners Club, Discover and more.